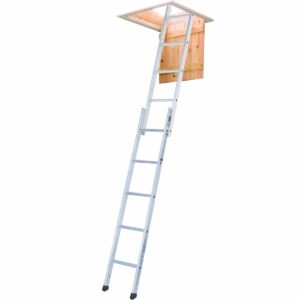
Most houses use loft ladders to help you get into your loft, so that you save space on a dedicated set of stairs. However, a badly installed or wrong loft ladder choice can make entry to the loft difficult or even put you at risk of injury.
This article will talk you through the basics of choosing a loft ladder. It will also explain for those with confidence in their DIY skills and an assistant how to install a loft ladder in their own home safely and properly.
Choosing a Loft Ladder
Choosing the right loft ladder is a vital first step. Loft ladders have different materials and designs, meaning some are not suited for specific houses. Fortunately at ERoofing we have a huge selection of Youngman Loft Ladders so you can find the one that’s right for you.
If you’re looking for a cost-effective loft ladder for a relatively small space, up to 2.6m, the best one by far is the Spacemaker Loft Ladder. It’s easy to install and light, but still offers a safe accent with grilled steps.
On the other hand, if your space is extremely restricted, you’ll need the Easiway. Unlike normal two section loft ladders it comes in three sections so it can lower even in extremely tight spaces.
If you want to maximise room in the loft itself, the Eco S Line 3 has you covered. Its folding action allows it to be stored within the hatch, saving on attic room. As a result it also comes with its own hatch, eliminating the need to purchase one separately.
Finally, if you need an extremely long and heavy duty ladder for a loft at the top of a high ceiling or one where you are taking heavy burdens up, you should invest in the Youngman Deluxe. It has double handrails, and a spring pivot arm that allows it to be pushed back up despite its considerable bulk.
Once you have selected your loft ladder you will need to begin to install it.
Installing Your Loft Ladder
You will need:
- Safety Gloves and Safety Goggles
- An Assistant
- Tape Measure
- Pencil
- A Power Drill
- A hatch suitable for the ladder you have chosen
- The ladder to be installed
- Three trimmers
- Framing Square
The installation process
Firstly, you will need to identify where you are going to make your hatch. If your loft already has an opening you can try to fit it there. Sometimes this existing door is already big enough, but most of the time you will need to enlarge it. Whether you’re making a new one or enlarging an existing one, you will need to make sure that you will have enough room to ascend the ladder without whacking your head on the roof above or without running into any water tanks.
If you are making adjustments, then you will need to cut the joists to allow the hatch and ladder box to fit. Measure your ladder box then work out where you’ll need to cut in order to make space. The ladder should be installed so that it extends in the same direction that the joists run in. After making the cuts then you will need to nail in three trimmers. These trimmers should be cut so along with a joist they form a rectangle that the ladder box can fit in.
As you make cuts use your framing square to make sure that you’re getting ideal 90 degree angles and that nothing is askew.
Installing the Ladder Box and Hatch
However, you will need to fit something to the box to make sure it won’t just fall through the hole while you screw it in. Measure the depth of the hole then nail battens along the sides of the box. Go up to the loft and – very carefully – have your assistant pass the box through to you in the loft. You will need to pass it sideways through the hole. Then, making sure to align it properly so the ladder will open the right way, lay the box in the hole so that the battens will suspend it.
Now you can finally fix your ladder permanently. Use your power drill to drill ten holes in the box, three lengthways per side and two widthways per side. If you are installing the Youngman Deluxe you may wish to use more holes for more screws. Once this is done, screw your wood screws through each hole.
Now you just need to fit your hatch into the hole from the bottom. Usually these hatches will come with their own screws, and you will just need to screw it in so it will fit correctly. Make sure it opens in a way that permits the ladder to extend. After this, pat yourself on the back for a job well done.


