
We’ve all been there—stepping into a bathroom that feels more like a steam room after a hot shower, with mirrors fogged up and the air thick with humidity. That’s where a good bathroom fan comes in, helping to clear the air and prevent mould and mildew from taking hold.
But what do you do if you need to vent that fan through the roof? It might seem tricky, but with the right approach, it’s a project you can handle.
In this article, we’ll break down the process in simple steps, so you can get the job done and keep your bathroom fresh and your home safe from moisture.
What You’ll Need
“But, what will I need to vent my bathroom fan straight through the roof?” we hear you cry. Admittedly, it’s not quite a stroll in the park, but with the right kit, you’ll be set up for success.
- Safety first: Grab a well-made roof ladder and don’t forget your safety goggles and gloves. Safety first, always.
- Cutting tools: You’ll need a sharp utility knife for precision cuts.
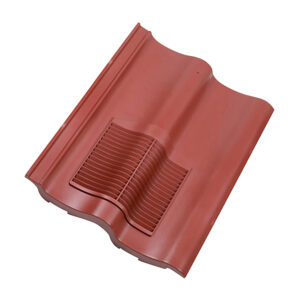
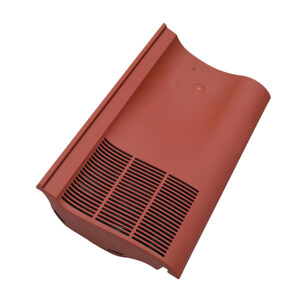
- Venting necessities: Pick up a strong roof tile vent, an adaptor, and some flexipipe to make all the right connections.
- The main event: The bathroom fan, of course!
- Extra supplies: While you’re at it, grab some flexible duct piping and foil duct tape to seal the deal.
- Power tools: You’ll need an electric saw—jigsaw or circular, your choice—and a power drill for the heavy lifting.
- Measuring up: Don’t forget a marker pen and tape measure to keep everything on point.
With your tool bag fully equipped, you’re set to attack this job head-on.
Preparation – Safety First
Before you fly up that ladder with all the eagerness of a child in a sweet shop, take safety seriously. Working at heights isn’t a lark, and it certainly isn’t the time to be winging it.
Ensure it’s a clear, dry day—rain or high winds are a no-no.
Deck yourself out in the full kit:
- Sturdy boots
- Gloves
- Goggles
- A hard hat
And, if you’re not over the moon about climbing roofs, or if your balance is as dodgy as a two-legged stool, consider roping in a professional. Did you know? We stock a terrific selection of decorating tools, like mud pans, trowels, and more, to ensure your DIY project goes without a glitch.
Safety first, right? Now, let’s make sure this job doesn’t turn sour.
Picking the Right Fan
Choosing the correct fan for your bathroom isn’t as intimidating as it sounds. First up, you’ll want to measure your bathroom—get the length, width, and height all sorted. Then, have a bit of a maths moment: multiply these dimensions to find the cubic feet.
Now, here’s the clever bit: divide that number by 7.5. That’ll give you the CFM (cubic feet per minute) rating you need for your fan.
Easy, right? Just make sure the fan fits snugly between your joists up in the loft and isn’t too far from your shower or loo for top efficiency.
Installation Step 1 – Fitting the Fan Housing
Right, now for rigging up the fan housing. First off, pick the spot in your bathroom where the fan will live. This spot must sit nicely between two joists and above an open area in the loft.
Next up, you’ll need to cut a hole in the bathroom ceiling where the fan housing will snuggle. Pop up to the loft and drill a pilot hole through the ceiling to mark the spot.
This small hole is your guide to drawing a larger square on the ceiling below.
Once marked, don your dust mask and safety gloves—safety is your priority, no exceptions.
Now, time to break out the saw—jigsaw or circular, your call—and carefully cut out the square.
Take it slow and steady, ensuring you don’t damage any hidden wiring or pipework. There you have it, a neat opening ready for the fan housing to fit right in.
Installation Step 2: Fitting the Roof Vent
Now then, this is the part where it feels a bit like swapping out a tricky puzzle piece—installing the roof vent.
Up on the roof, make sure it’s a clear day. You wouldn’t want a spot of rain to turn this into a slip-and-slide adventure.
Find the roof tile directly above where your fan’s sitting or as close as you can manage.
Sometimes, you might need a bit of help here. Have a friend below tap up with a broomstick so you can spot the right tile with a bit more ease.
Gently remove this tile and make room for the vent. Get out your utility knife and prepare to perform a bit of surgery on the underlay felt.
Mark a square large enough for the vent to fit through and slice from corner to corner, creating four flaps that can fold back neatly.
Pop the roof vent into place, ensuring it nudges through the underlay properly. It’s like fitting the last piece of a jigsaw—satisfying and a bit of a relief!
Connecting Everything
Here’s the nitty-gritty part—linking everything up, and it’s more painless than you might think.
Firstly, take your adaptor and flexipipe. Attach these to the bottom of your roof vent. Think of it like cracking together LEGO bricks – make sure each piece fits together closely to avoid any mischievous draughts or water trickling in.
Now, run your piping from here right down to the exhaust port of your fan. Keep it as straight as possible to ensure an efficient airflow—no one likes a windy path.
Finally, give yourself a bit of slack with the piping. A little give can avert any tension or pull. Connect it to the power socket to breathe life into your fan.
You’re nearly done! Just a few tweaks here and there, and you’ll be set to switch it on and see your handiwork in action.

Final Steps and Testing
Time to finish up and power on!
To begin, screw in the grill from underneath. Not too tight now, just snug enough so it doesn’t clatter around. Then, give that fan a good plug-in and switch it on. Ah, listen to that! Smooth running without a pitfall, that’s what you’re after.
Take a moment, and have a gander around to make sure everything looks tickety-boo. No peculiar noises or bits out of place.
Lastly, make it a habit to check this setup now and again, just to keep things in tip-top shape.
Final Thoughts
Well done – you’ve cracked it. You’re officially a DIY pro and your bathroom’s now sporting a top-notch venting system.
Go on, give yourself a pat on the back—you’ve earned it. Now, every shower or bath will be a bit fresher, all thanks to your handiwork.
For more resources on home improvement and roofing materials, check out our comprehensive blog section – it’s filled with how-to guides that’ll help you get the job done easily and professionally. Happy DIY-ing!


