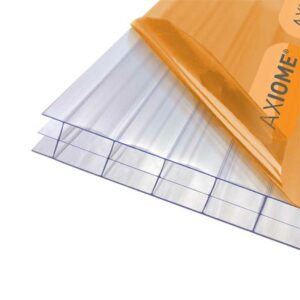
With their superior insulation factor and durability, polycarbonate sheeting is becoming ubiquitous for greenhouse glazing as well as other purposes. However, their light weight means precautions need to be taken against wind-updraft. Using proper fixings can keep your polycarbonate in place securely.
There are two methods of fixing polycarbonate sheets to timber. The first method is to directly use screws on the polycarbonate sheets themselves. The second is to use glazing bars to hold the sheets. The first method is fine for garden features, especially in areas without a lot of wind. The second method is preferred for greenhouses and conservatories, especially where there’s a lot of wind updraft.
Method One
For the first method, you will need:
- A saw for cutting polycarbonate to size
- Safety gloves and goggles
- Axiome polycarbonate sheeting
- ALUKAP Anti-Dust Breather Tape
- ALUKAP-XR Button Fixings
- ALUKAP-XR Endstop bars
- Low modulus sealant (such as the Everflex Premium 450 Builders Silicone) with sealant gun
- Power drill and screwdriver
- Securbond Flashing Tape
First you will need to make careful measurements. A mistake with measurements could prove very costly. Then you can begin cutting the polycarbonate sheets to size. You can do this with a circular saw or jigsaw. Make sure to be careful, again, since a mistake at this stage could require getting all new sheets. Make sure to clamp the sheets and wear face protection.
After cutting, the sheets should be prepared by rolling back the anti-scratch film a few centimetres and fixing anti-dust tape to the ends. This prevents dust and small insects from entering the hollow chambers of the sheets while still allowing airflow and preventing condensation. The endstop bar should then be pushed just slightly onto the bar so it does not pass the edge of the dust tape.
A low modulus sealant like Everflex Premium 450 Builders Silicone then needs to be applied around the edge of the dust tape and the endstop bar pushed over it. This will totally seal the sheets’s end off.
The wood should be pre-drilled before screwing the fixings in. The sheets will also need to have corresponding holes drilled in them. For most applications the sheets should have fixings spaced 100mm apart, though if you want precision you may want to speak to a structural engineer for your specific needs.
If you need to join multiple sheets together using an H-section, then this should be done now just after drilling. Afterwards, the sheets should be laid in place on the timber structure. The fixings should be firm but not ultra tight. Overtightening the screws can be disastrous and can crack the sheets.
After the sheets have been screwed in place you can look at any flashing if needed. Independent structures will not need flashing, while ones that hit abutments at walls can benefit from it.
Method Two
For larger greenhouses and greenhouses in particularly windy places, using glazing bars as well – be they ALUKAP-XR or Snapa – is highly recommended to counteract the more potent wind updraft. Snapa is better in terms of cost and ease of installation, while ALUKAP-XR provides a super-secure fit.
If you want to install glazing bars as well, you will need:
- ALUKAP-XR or Snapa glazing bars
- ALUKAP-XR end caps or Snapa endcaps (as appropriate for the glazing bar)
- AKUKAP-XR or Snapa Wall Flashing (if needed)
- Soft hammer
- Face shield
This time your glazing will have to take into account the glazing deductions caused by glazing bars. It should end up being a few millimetres shorter than an exact fit because you don’t want the polycarbonate to crack from thermal expansion with no room to grow.
You will also need to make cuts to the rafters themselves. The fundamental difference between ALUKAP-XR and Snapa is that ALUKAP-XR holds the sheets to the rafters while Snapa holds the sheets themselves. The cuts to the rafters should allow 12mm spaces in the middle for regular ALUKAP-XR bars, 42mm for the glazing bars and 38mm for the wall bars.
Also remember that you will need to cut the glazing bars to the correct lengths as well, unless you are lucky enough to only need them in the lengths they are sold at. As with polycarbonate the measurements should be done very carefully. A circular saw can be used to make these cuts on both aluminium and PVC. However, for cutting aluminium, a fully lubricated metal cutting grade blade should be used. Blade wax sticks can be used to keep the blade lubricated, which reduces the chance of it catching which can itself lead to severe injury. If you are using ALUKAP-XR you will need to cut the rafter gaskets, side gaskets and top clips to the same length.
Now the installation process can really begin. With Snapa, the bottom section of the glazing bars should be screwed in, the panels laid in them, and then the top section should be snap fit to hold them in place. With ALUKAP-XR the rafter gaskets and the sheets should be laid in place, then the side gaskets should be inserted into the glazing bars and they should be screwed into place. Finally, the endcaps can be used on all the glazing bars for additional protection. ALUKAP-XR glazing bars will require top clips to be hammered into place after the end caps are in position.
All that’s left to do is install the flashing. The soft foam will allow for the presence of glazing bars, while the aluminium section will serve as the main water protection. Securbond Flashing Tape should be used to finish it off.


